Tuesday, 30 April 2013


 Key Nutrients for Plants and VegetablesEpsom Salt is 

Magnesium Sulfate — 


As spring draws near, some of the country’s top gardeners recommend using Epsom salt as an inexpensive way to start or improve your garden.
Epsom salt – actually magnesium sulfate – helps seeds germinate, makes plants grow bushier, produces more flowers, increases chlorophyll production and deters pests, such as slugs and voles. It also provides vital nutrients to supplement your regular fertilizer.
Cornell University Assistant Professor Neil Mattson says plants will show visual cues if they are starved for a particular nutrient. If a plant’s leaves turn yellow all over the plant, it can be a sign they need more sulfate. If lower leaves turn yellow between the veins (that is the veins stay green), they may need more magnesium. Some nutrient disorders can look alike so growers can contact their county extension agents either before they plant to test a soil sample or, if they notice a problem, they can bring in a plant for diagnosis.
“Plants need those building blocks." says Mattson."  Magnesium and sulfur are essential nutrients.”
Although magnesium and sulfur occur naturally in soil, they can be depleted by various conditions, including heavy agricultural use. But unlike most commercial fertilizers, which build up in the soil over time, Epsom Salt is not persistent so you can’t overuse it.

Mattson – who adds Epsom salt to his fertilizer for plants such as roses, pansies, petunias and impatiens – says gardeners can proactively mix Epsom salt with fertilizer and add it to their soil monthly, or they can mix one tablespoon with a gallon of water and spray leaves directly every two weeks.
Epsom Salt is recommended by Master Gardeners and used regularly by commercial growers around the world. Tests by the National Gardening Association confirm that roses fertilized with Epsom Salt grow bushier and produce more flowers, and it also makes pepper plants grow larger than those treated only with commercial fertilizer.


Here are some other tips for using Epson salt in the garden:
  • Houseplants: 2 tablespoons per gallon of water; feed plants monthly.
  • Roses: 1 tablespoon per foot of plant height per plant; apply every two weeks. Also scratch 1/2 cup into soil at base to encourage flowering canes and healthy new basal cane growth. Soak unplanted bushes in 1 cup of Epsom Salt per gallon of water to help roots recover. Add a tablespoon of Epsom Salt to each hole at planting time. Spray with Epsom Salt solution weekly to discourage pests.
  • Shrubs (evergreens, azaleas, rhododendron): 1 tablespoon per 9 square feet. Apply over root zone every 2-4 weeks.
  • Lawns: Apply 3 pounds for every 1,250 square feet with a spreader, or dilute in water and apply with a sprayer.
  • Trees: Apply 2 tablespoons per 9 square feet. Apply over the root zone 3 times annually.
  • Garden Startup: Sprinkle 1 cup per 100 square feet. Mix into soil before planting.
About Epsom salt
Epsom salt – actually magnesium sulfate – is one of the most versatile household products, with uses ranging from creating at-home spa treatments to soothing achy muscles to helping start or improve gardens. It’s been used therapeutically for hundreds of years, and it’s gaining a new generation of fans looking for a safe, economical alternative in a sea of expensive, over-the-counter remedies. Epsom salt is easy to use, easy to find in your local pharmacy or grocery store and it costs about the same per use as a cup of coffee.

Courtesy of:  www.perfectgardeningtips.com

Repinned FYI:  www.hummingbirdjewelry1.etsy.com.


.


Wednesday, 24 April 2013

Tote bag....courtesy of liveinternetru.com

repinned by:  http://www.hummingbirdjewelry1.etsy.com


Sunday, 21 April 2013


HOW TO CLEAN CARPETS WITH LAUNDRY DETERGENT: 
  It’s a stain fighter, it’s gentle on carpets (and carpet cleaners), and it makes your whole house smell fresh. And I believe I used less detergent than actual carpet shampoo.
Carpet Cleaner
 After testing a little area first to make sure my idea would work (and not ruin the carpet!), I dripped a little diluted laundry detergent right on one of the toughest stains. (Make sure the detergent is diluted, or it will leave a residue on the carpet, making it appear dirty no matter how clean it really is. 


Carpet Cleaner


Carpet Cleaner

012

THIS IS THE WHOLE AREA CLEANED. 
This tip courtesy of: 
Shared with you by:

 http://www.hummingbirdjewelry1.etsy.com


Sunday, 14 April 2013

10 WAYS TO USE APPLE CIDER VINEGAR

10 Ways to Use Apple Cider VinegarCourtesy of www.naturalnews.com
Repinned by: http://www.hummingbirdjewelry1.etsy.com

Saturday, 13 April 2013


GREAT USEFUL IDEAS
courtesy of repinly.com.  Repinned by:  hummingbirdjewelry1.etsy.com. 


Some useful ideas

Friday, 12 April 2013


Delicious Two Ingredient Recipe:


A box of Angel Food Cake mix (just the contents of the box, no need to 

follow the directions on the box), and combine it with a 20 ounce can of 

crushed pineapple in its own juice. (No need to use a mixer, just stir it by 

hand) When you do this, something magical happens. The mixture starts

 to froth and it turns into an amazingly airy, fluffy bowl of deliciousness 

right before your eyes

A box of Angel Food Cake mix (just the contents of the box, no need to follow the directions on the box), and combine it with a 20 ounce can of crushed pineapple in its own juice. (No need to use a mixer, just stir it by hand) When you do this, something magical happens. The mixture starts to froth and it turns into an amazingly airy, fluffy bowl of deliciousness right before your eyes. Once it's all mixed up, simply pour it into a 9 x 13 baking dish and bake it at 350 for 30 minutesOnce it's all mixed up, simply pour it into a greased 9 x 13

 baking dish and bake it at 350 for 30 minutes.


 Courtesy of: dawnsquiltcorner.com
PINTEREST:  http://pinterest.com/hummingbirdjewe/


Thursday, 11 April 2013

Homemade Sun Dried Tomatoes (oven dried)


Sun-drying tomatoes is a nice method of preservation because it requires little work, they are a lot less expensive homemade than from the store.

PROCEDURE:

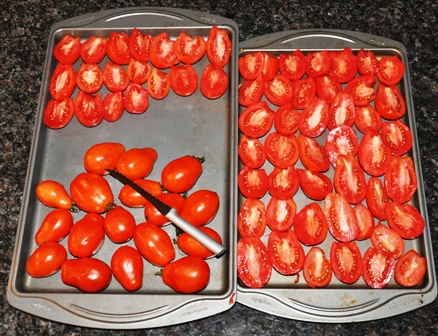
A Roma or paste type tomato works best – simply slice them in half and lay them out on baking sheets skin side down.  They shrink a lot so they can be crowded on the baking sheets to start.

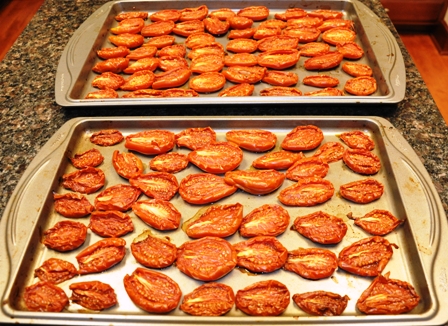
After slicing them, they simply go into a 200°F oven until dried – approximately 12 hours depending on the type and size of tomato used.  I like to start checking them after about half the time - the photo below shows what these looked like at 6 hours.

I continue checking them and removing any that are ready until they’ve all dried to my liking.  Then I store them in a ziplock bag in the freezer, and they’re conveniently on-hand whenever I need them.  Simply remove as many as  needed from the ziplock and soften in a small amount of oil or water (depending on the recipe) prior to using.  


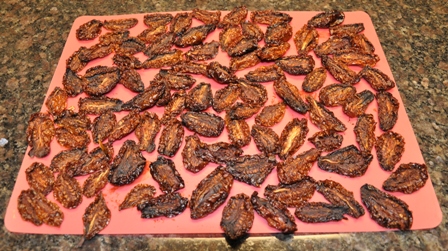
The photo below shows the final product before being packaged for storage. 


Recipe courtesy of:  http://www.betterhensandgardens.com/2011/09/11/homemade-sun-dried-tomatoes-oven-dried-really/

Repinned by:  https://www.hummingbirdjewelry1.etsy.com
PINTEREST:  http://pinterest.com/hummingbirdjewe/


http://www.betterhensandgardens.com/2011/09/11/homemade-sun-dried-tomatoes-oven-dried-really/

REPURPOSED DRESSER DRAWER INTO A PET BED


Repinned by:  http://www.hummingbirdjewelry1.etsy.com
Pinterest:   http://pinterest.com/hummingbirdjewe/


Sunday, 7 April 2013

All Natural dyes for fabric, t-shirts, eggs etc.,

Feel free to use these all natural color additives without fear of bad reactions. 

Friday, 5 April 2013


Try Wood Ash As A Soil Fertilizer:


Consider saving the ashes from this summer’s campfires, backyard fire pits and even your home’s fireplace or wood stove, did you know they can be spread throughout the garden to act as an organic soil booster? They’ll also deter pests too! Here’s how it works:
Natural Garden Booster
It's Surprising What You Can Use As A Garden Booster
Wood ashes contain potassium, calcium, phosphorus and magnesium which encourage strong root and stem growth.
It’s main benefit as a garden pick-me-up though is that it increases the soil’s alkalinity (which you’ll want if it’s acidic). It’s considered a substitute for garden lime since they both sweeten soil, though keep in mind that the ashes will produce results faster since they’re more water soluble.
Important! Don’t use if soil is alkaline, test first if you’re unsure.
How to use: Sprinkle them on top of tilled dirt then take a rake and mix in evenly, make sure to break down any clumps since a heavy concentration will result in a potentially harmful salt spot once it gets wet.
Apply when the dirt is dry, it’s not windy and at least 3 weeks before planting to give it a chance to work its magic (and not be too strong for seedlings).
How much to use: It’s advised to use no more than 25 gallons per 1000 square feet per year  and that you test the soil before each application.
If you have already planted, you can still take advantage of it by simply side-dressing around growing plants. Use it in vegetable gardens, flower beds, around shrubs and even on your lawn!
  • Rose bushes & shrubs: Treat with 1/2 to 1 pound of wood ash (per year).
  • Lawns: Apply no more than 10 to 15 pounds of ash per 1,000 square feet of lawn (only if soil pH is less than 7.0, don’t use if potassium levels are high).
Natural pest repellent? You bet! Bugs such as garden slugs and snails are not fond of scraping their bellies across the ashes so they’ll move on to find more friendlier ground. To be effective you’ll need to spread a fresh batch around plants after each rain, just a lightly sprinkled layer will do (a light layer also won’t sway the pH level that much so you can use it without too much concern).
They are pretty strong at first and can burn a plant’s leaves if it comes in contact with them, rinse plants well after dressing. Don’t sprinkle too close to young plants since they’re more sensitive to direct contact.

Tips

  • You can also add them to the compost pile (about every 6″ or so), this helps reduce odors and increase the rate of decomposition (not too heavy, just a light layer will do).
  • Do not use any that came from wood that had a chemical preservative applied and only use if produced from wood fires that have not included other items (since they may contain traces of harmful materials for the dirt or plants).
  • Remember, this is a substitute for lime which means it decreases a soil’s acidity. Don’t use around acid loving plants (such as blueberries).
  • Those from hardwoods contain more nutrients than found in softwoods. Also those from young wood contain more nutrients than those from older wood.
  • If the ashes were exposed to rain before being collected, are they still good to use? Not really, the nutrients will seep out with the water (which is fine when they have already been applied to the garden but not before).
  • Wear eye protection, a mask and gloves when handling since it can be harmful if you breathe it in or gets in your eyes.
  • How to store: keep tightly sealed in a container so they stay dry until needed.

Monday, 1 April 2013


Bath melts are tiny solid cubes of oils that stay solid at room temperature, but gently melt into a warm bath, enriching the bath with moisturizing oils and fragrance.

YOU'LL NEED.....
1) A saucepan
2) An ice cube tray or suitable small moulds

INGREDIENTS
Weights are not necessary in this recipe. Simply use the following proportions in the quantities you require.
2 parts cocoa butter
1 part sweet almond oil

Essential or Fragrance oil (20-30 drops)

HOW TO.....
Gently melt the cocoa butter over a low heat. Once just melted add the sweet almond oil and mix thoroughly. Remove from heat and leave to cool a little (not too much, it still should be liquid). 
Add  essential oils.  (20 - 30 drops). Stir or whisk in well. 
 I don't recommend you use color, it's not necessary. 
Once cooled but still completely liquid, pour into ice cube tray moulds and cool in the fridge or freezer. Don't actually freeze them, just ensure they are very cold and completely solid.
Press out of ice cube moulds as you would an ice cube and leave at room temperature.

A very simple recipe for making a soothing and rejuvenating foot cream.

YOU'LL NEED.....
1) A small mixing bowl

2) A suitable sized storage tub or jar
3) A small (60 g) (2 oz.) ointment jar with lid.

INGREDIENTS
Moisturizing Cream Base.  (such as St. Ives or Vaseline Intensive Care Lotion)
 Peppermint Essential Oil
A few drops of our Blue or Green Liquid Color (Optional)

HOW TO.....Measure out 2 oz. (60 g) of cream base.
Add 18 drops of Peppermint Essential Oil  to the cream base.
Using a spoon or a whisk mix the Peppermint Oil into the cream base until the peppermint oil has completely dispersed.
Add a few drops of blue liquid color if desired and stir until a 'cool' pale blue colour is achieved.
Using a small spoon, fill the small jar/s with the finished cream.

http://www.hummingbirdjewelry1.etsy.com
http://pinterest.com/hummingbirdjewe/
twitter.com/iwbib
Facebook Search Name:  Hummingbird Jewelry